… out of paper, or cardboard!
If you’ve seen the video, “In which Jamie has an idea”, you may want to try this at home. It’s a great project for the kids!
Simply download this PDF, and cut along every black line. Don’t cut the gray lines! These are places where the paper is folded only.
https://paulhahn.com/wp-content/uploads/Paper_Piano.pdf
If you have a problem or a question, you can email Jamie at: jem@paulhahn.com.
Have fun!
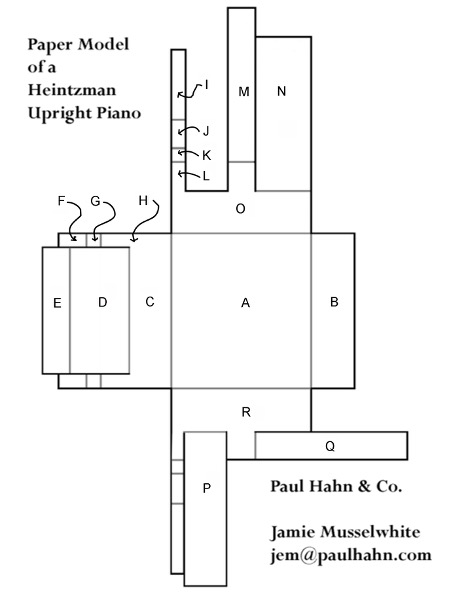
A: The back of the piano. In a real piano, this is where you’d find the soundboard on the outside, and the strings on the inside.
B: The lid. Fold this along the grey line toward you.
C: The Bottom Board: The board at the bottom of the piano, hence the name. Its main function is to hold the mechanism for the pedal action.
Fold this along the grey line toward you.
D: Kick Board: The removable board that your kids kick with their feet because they can’t reach the pedals. It covers the bottom part of the inside of the piano, including the mechanism for the pedals, and is a great place to hide things behind. This part folds up.
E: This folds down to form the bottom of the keybed.
F, G, and H form the top and bottom of the Toe Blocks, which, in a real piano are the extensions glued onto the bottom of the gable that prevent the piano from falling over on top of you. Bless them! SCIENCE FACT: Pianos have two toes, much like a sloth. This might explain why they are so hard to move.
F: Fold this up to form the top of the toe block.
G: Fold this up to form the front of the toe block.
H: Fold this back to form the bottom of the toe block:
I, J, K, and L form the sides of the toe block.
M: Fold this across to make the front of the keybed. This is the case part on a real piano that supports the keyboard. It’s actually removable by a technician, allowing the piano to turn sharp corners.
N: Fold this across to form the front board of the piano.
O and R are the sides of the piano called, Gables. Fold these inward.
P: is the main part of the Kickboard. Fold this over, on top of part D.
Q: This is the top of the keyboard. Draw some keys on it if you’d like!